Post by Slinger on Jun 6, 2019 16:14:13 GMT
Martin's travails with Photoshop have prompted me to post a few basic, and hopefully helpful, tips I've picked up during the 20 or so years I've used 'Shop. - The clue's in the thread title.
Firstly, you can purge a lot of existing unwanted crap from Photoshop using Edit >> Purge >> Undo/Clipboard/Histories/All and Video Cache. If there's nothing to purge the option will be greyed out. It's not wise to do this in the middle of using Photoshop, but it's worth a check when you first open it up, but before you open any files you intend working on.
Generally speaking, temp files should be deleted on shutting down Photoshop. If they're being added to each time it's used and piling up then it's probably a reasonable assumption that Photoshop is shutting down incorrectly. Some of the processes detailed below can help stop that happening.
First, let's try to stop Photoshop creating so many temp files in the first place. In fact, hopefully, none at all.
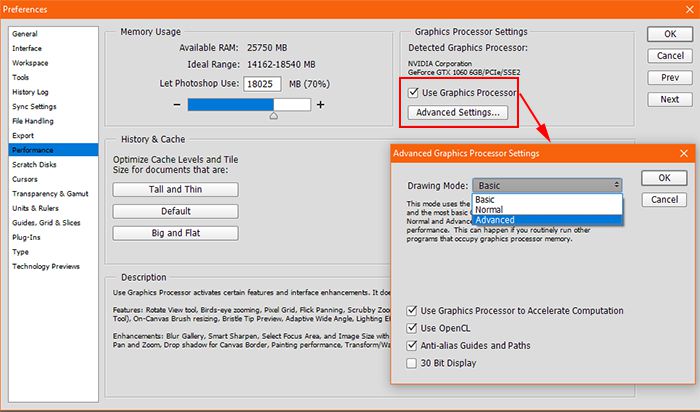
In Photoshop, go to Edit >> Preferences >> Performance and check the number of History States (how many times you can use Edit >> Step Back, or delete actions from your History tab) I think the default is 20; mine's set at 50 though. However, be aware that too many states on a single image will usually result in History Palette literally “eating” RAM. If you think the setting is too high then scale it back. I'd say start at 20 and if you have no issues then leave it there, or you could try increasing it by 5 or 10 at a time all the while Photoshop is behaving itself and not grinding to a halt.
You can also check these settings in Edit >> Preferences >> Performance >> Advanced Settings while you're there...

The description of the drop-down will change as you select it. Pick what you consider to be the mode that is most suited to your hardware, or simply choose whichever mode makes Photoshop work the fastest and most smoothly for you. At the most basic level you're telling Photoshop how much work it can offload to your graphics card.
Next:
Go to Edit >> Preferences >> Scratch Disks and...
a) Make sure the disk you're using as a scratch disk has at least 40Mb free
b) Try spreading your scratch disk over two (or more) hard drives if you're short on space on a single drive. You can set the order in which the disks are accessed.
c) If possible use an SSD drive for your scratch disk. Faster = Better.
A lot of power users create a dedicated hard drive partition solely for the Photoshop scratch disk. I'm actually using a spare 240Mb SSD purely as my first-choice scratch disk.
Next, check Edit >> Performance >> Memory Usage
It should be set at around 60-70% if (no pun intended) memory serves.
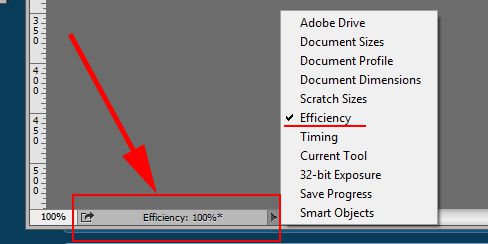
Here's another handy little tip that not everybody knows about: At the bottom of your
Photoshop window is a little, seemingly insignificant, fly-out. Click on the arrow, on the right of the fly-out, and it will bring up a menu.

There are actually quite a few useful things there, but the one we're interested in is Efficiency. Click it, and now you can leave it there permanently as a handy instant reference.
If you’re lucky, it will always say 100%. Anything below 100% indicates that Photoshop has used all of its allocated RAM and is using your hard drive as a scratch disk, which will slow it down. If this happens you can try upping the value in... Edit >> Preferences >> Memory Usage in small increments, but, as a rule of thumb, try not to go above 85% or it may start affecting other applications, making Windows unstable. The other option is to add more physical RAM to your machine.
The usual Windows rules apply too. Make sure you Defrag/Optimise your drives if they need it, especially any that host your Photoshop Scratch Disk(s), and run Disk cleanup or use a third-party application like C Cleaner periodically.
I hope this is useful to somebody.
Firstly, you can purge a lot of existing unwanted crap from Photoshop using Edit >> Purge >> Undo/Clipboard/Histories/All and Video Cache. If there's nothing to purge the option will be greyed out. It's not wise to do this in the middle of using Photoshop, but it's worth a check when you first open it up, but before you open any files you intend working on.
Generally speaking, temp files should be deleted on shutting down Photoshop. If they're being added to each time it's used and piling up then it's probably a reasonable assumption that Photoshop is shutting down incorrectly. Some of the processes detailed below can help stop that happening.
First, let's try to stop Photoshop creating so many temp files in the first place. In fact, hopefully, none at all.
In Photoshop, go to Edit >> Preferences >> Performance and check the number of History States (how many times you can use Edit >> Step Back, or delete actions from your History tab) I think the default is 20; mine's set at 50 though. However, be aware that too many states on a single image will usually result in History Palette literally “eating” RAM. If you think the setting is too high then scale it back. I'd say start at 20 and if you have no issues then leave it there, or you could try increasing it by 5 or 10 at a time all the while Photoshop is behaving itself and not grinding to a halt.
You can also check these settings in Edit >> Preferences >> Performance >> Advanced Settings while you're there...

The description of the drop-down will change as you select it. Pick what you consider to be the mode that is most suited to your hardware, or simply choose whichever mode makes Photoshop work the fastest and most smoothly for you. At the most basic level you're telling Photoshop how much work it can offload to your graphics card.
- Basic—Uses the least amount of GPU memory to run the most basic OpenGL features when sharing the GPU with other applications or when experiencing slow responsiveness. Select this option if you have other programs running that also use the GPU or if you notice bad screen redraws or slower performance when using GPU-accelerated features.
- Normal—Is the default setting. It uses a large amount of GPU memory to support advanced OpenGL features and should be selected if you regularly use the GPU-accelerated features in Photoshop.
- Advanced—Uses the same amount of memory as the Normal mode, but enables more advanced features to improve drawing performance. This setting is best when working in 3D or when working extensively with the GPU-accelerated features.
Next:
Go to Edit >> Preferences >> Scratch Disks and...
a) Make sure the disk you're using as a scratch disk has at least 40Mb free
b) Try spreading your scratch disk over two (or more) hard drives if you're short on space on a single drive. You can set the order in which the disks are accessed.
c) If possible use an SSD drive for your scratch disk. Faster = Better.
A lot of power users create a dedicated hard drive partition solely for the Photoshop scratch disk. I'm actually using a spare 240Mb SSD purely as my first-choice scratch disk.
Next, check Edit >> Performance >> Memory Usage
It should be set at around 60-70% if (no pun intended) memory serves.
Here's another handy little tip that not everybody knows about: At the bottom of your
Photoshop window is a little, seemingly insignificant, fly-out. Click on the arrow, on the right of the fly-out, and it will bring up a menu.

There are actually quite a few useful things there, but the one we're interested in is Efficiency. Click it, and now you can leave it there permanently as a handy instant reference.
If you’re lucky, it will always say 100%. Anything below 100% indicates that Photoshop has used all of its allocated RAM and is using your hard drive as a scratch disk, which will slow it down. If this happens you can try upping the value in... Edit >> Preferences >> Memory Usage in small increments, but, as a rule of thumb, try not to go above 85% or it may start affecting other applications, making Windows unstable. The other option is to add more physical RAM to your machine.
The usual Windows rules apply too. Make sure you Defrag/Optimise your drives if they need it, especially any that host your Photoshop Scratch Disk(s), and run Disk cleanup or use a third-party application like C Cleaner periodically.
I hope this is useful to somebody.


